Peter Westwood and some other WordPress core developers have written a great plugin for WordPress plugin and theme developers: the Debug Bar. It plugs into the Admin Bar that was introduced with WordPress 3.1 and outputs various details about the current page, but to (super) admins only.

Thanks to the consequent usage of WordPress Plugin API functions there is a fairly easy and straightforward way of outputting your own debug information into the Debug Bar.
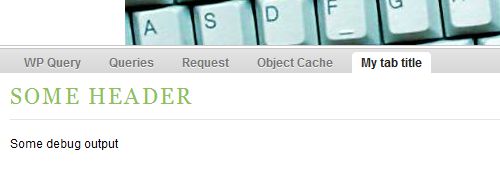
Your own Debug Bar Panel

You should create a separate file for your Debug Bar tab, let’s call it my-debug-bar-panel.php, and place it in the same directory as your plugin file or your theme’s functions.php file. In this file you create a child class of Debug_Bar_Panel, e.g. my_Debug_Bar_Panel, with at least one method render() in which you can output everything that should be on your tab.

1
2
3
4
5
6
7
8
9
10
11
<?php
class my_Debug_Bar_Panel extends Debug_Bar_Panel
{
  function render()
  {
    echo '<div id="my-debug-par-panel">';
    echo '<h3>Some header</h3>';
    echo '<p>Some debug output</p>';
    echo '</div>';
  }
}

Now back to your main plugin file or functions.php: You need a function that hooks into debug_bar_panels. I put a double check in my example to make sure the base class Debug_Bar_Panel exists (since you never know whether they drop this in a future release which would cause fatal runtime errors). Then you create a new instance of my_Debug_Bar_Panel with the title, which you would like to see on your tab, passed to the constructor:

1
2
3
4
5
6
7
8
9
10
function my_debug_bar_panels($a)
{
  if (class_exists('Debug_Bar_Panel'))
  {
    require_once dirname(__FILE__).'/my-debug-bar-panel.php';
    $a[]=new my_Debug_Bar_Panel('My tab title');
  }
  return $a;
}
add_filter('debug_bar_panels', 'my_debug_bar_panels');

Believe it or not, you’re done!

Here’s why I don’t normally apply updates on the first day: Backdoors in three popular WordPress Plugins

June 22, 2011 | No comments

I have just released my newest WordPress plugin to the public:

Open Graph Pro automagically adds Open Graph Protocol metadata to your WordPress powered blog/website. Through the Open Graph Protocol you can control how your posts and pages appear on Facebook when someone shares a link or likes your stuff.

The plugin does not add any “Like” buttons to your site just yet, but that’s on my to-do-list.

It does however give for a great deal of customization already by allowing you to change the object type of your entire site as well as the object type of individual pages, e.g. when you have a single page for each album or song of your band, or for each product of your company, etc. If you go to the settings page in the admin section of your site you can enter your Facebook user ID and give your site/blog the full potential of a Facebook page.

And just in case you’re wondering: I’m not using this plugin on this site at the moment, because liking or sharing stuff on Facebook only looks good with images, or it actually looks really crappy without them, and as you may have noticed I have very little eye-candy on my site at the moment. Now that the majority of all the coding is done I will focus next on the visual aspects of this blog, and then install the plugin when things have become more graphical around here…

I hope he takes this down to the Cafe: 1987 Compaq Portable III (286 based) with Wireless and Lynx part one, and here’s part two (seen it on Hack a Day)

June 19, 2011 | No comments

In the newest version (0.4.1) of my Comment E-Mail Verification plugin I fixed a bug that caused the verification link to malfunction with some setups.

Download it directly from the wordpress.org plugin directory

This update was inspired by user comments. Thanks for all your input.

Cool: JavaScript minification techniques (via)

April 22, 2011 | No comments

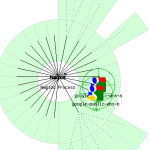
The Nagios Statusmap is one of those features that gets a lot of attention when you first set up your monitoring server, but when looking back after a while most people notice that they don’t really use it at all.

When it comes to daily monitoring I never found it very useful, either, but it has always served one important purpose for me: when adding new hosts or networks the Statusmap reveals whether I got all my parent/child relationships right. And since I work in a dynamic and growing environment I add a lot of hosts on a regular basis.

There is one thing that always annoyed me when looking at the Statusmap: when you exclude certain host groups from the map, only the host icons for those hosts get removed, but the map still shows their status in green or red, and with over a hundred hosts it’s still very hard to identify individual hosts.

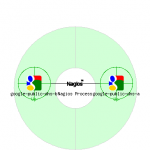
Today I stumbled across a patch for the Statusmap on the Nagios Exchange that addresses this very issue. It really excludes the hosts from the map, i.e. it is re-drawn as if the excluded hosts just didn’t exist.

Here’s an example:

original Statusmap (before the update)

improved Statusmap (after the update)

If you would like to update your Nagios install, proceed as follows. I’m assuming that you have built Nagios yourself. I have tested this with the most recent version of Nagios 3.2.3

Before you begin, cd to the cgi folder inside your Nagios source download folder, e.g. ~/downloads/nagios-3.2.3/cgi

1
2
3
4
5
6
7
curl "http://exchange.nagios.org/components/com_mtree/attachment.php?link_id=1807&cf_id=24" > statusmap.diff
patch statusmap.c statusmap.diff
make statusmap.cgi
cp statusmap.cgi /usr/local/nagios/sbin/
cd /usr/local/nagios/sbin/
chmod g+w statusmap.cgi
chown nagios:nagios statusmap.cgi

If you want to re-direct users from your subdomain(s) to your main site you can use a virtual host configuration like this:

1
2
3
4
5
<VirtualHost *:80>
  ServerName www.ten-fingers-and-a-brain.com
  ServerAlias *.ten-fingers-and-a-brain.com
  Redirect permanent / http://ten-fingers-and-a-brain.com/
</VirtualHost>

If you want to have the main site under the www name you should change the configuration like this:

1
2
3
4
5
<VirtualHost *:80>
  ServerName ten-fingers-and-a-brain.com
  ServerAlias *.ten-fingers-and-a-brain.com
  Redirect permanent / http://www.ten-fingers-and-a-brain.com/
</VirtualHost>

Please make sure that your main site comes before this one in the configuration, e.g. by placing it at the top of the same file.

You thought WordPress does this without additional configuration? Well, you’re generally right, but if you let WordPress do the work that’s one extra round of loading PHP and connecting to the database. My approach is much faster and causes less server load.

Why bother? For instance because Google or Bing will not see duplicate content, both under the main site and the www subdomain. Avoiding duplicate content has a positive effect on your ranking in search results.

bug in function wp_count_comments in wp-includes/comment.php (with patch for WordPress 3.1)

March 17, 2011 | No comments

The newest version (0.4-beta) of my Comment E-Mail Verification plugin now has an option to hold comments for moderation even after the authors have verified their E-mail addresses.

Download it directly from the wordpress.org plugin directory

This update was inspired by user comments. Thanks for all your input.

This is a beta version because the entire moderation/verification process requires some more streamlining and new default messages, but I felt there would be an audience for an early update anyway. If you have any suggestions or spotted an error: please share!

« Older entries § Newer entries »